

Model compression uses quantization to convert a full-precision fine-tuned model into a low-precision version, reducing the MU specification and cost required for deployment. This topic describes how to create and manage model compression tasks in the console.
Feature overview
Model compression uses quantization to convert a full-precision fine-tuned model into a low-precision version, reducing the MU specification required for deployment while preserving model capabilities, thereby lowering inference deployment costs. On the Model Studio platform, model compression specifically refers to quantization and does not involve structural pruning or knowledge distillation.
Model compression is an optional step in the model production pipeline. The complete pipeline is: Fine-tuning → Model compression → Deployment. You must first complete fine-tuning training, then compress the resulting fine-tuned model, and finally deploy the compressed model as an inference service.
Supported models
The models currently supported for compression are listed in the table below. Refer to the console for the actual list.
- China (Beijing)
- Singapore
Model series | Base model | Deployment specification before compression | Deployment specification after compression |
|---|---|---|---|
Qwen | qwen3.5-flash-2026-02-23 | MU1*2(¥108/hour) | MU5/MU8/MU9 |
Qwen | qwen3.6-plus-2026-04-02 | MU1*8(¥432/hour) | Refer to the console |
Usage limits
- Available only in the North China 2 (Beijing) region.
- Only custom models produced through fine-tuning on the Model Studio platform are supported. Base models and third-party models are not supported.
- Compressed models cannot be further fine-tuned, nor can they be compressed a second time.
Create a compression task
Prerequisites
Before using the model compression feature, ensure that a custom model fine-tuned on the Model Studio platform is already available in the current workspace. If you have not yet completed model fine-tuning, first complete the training by referring to Fine-tuning.
Procedure
- Log in to the Model Studio console. In the left navigation pane, select Model Compression.
- On the model compression page, click Create Compression Task. The upper-right corner of the page also provides a Back to Old Version entry.
-
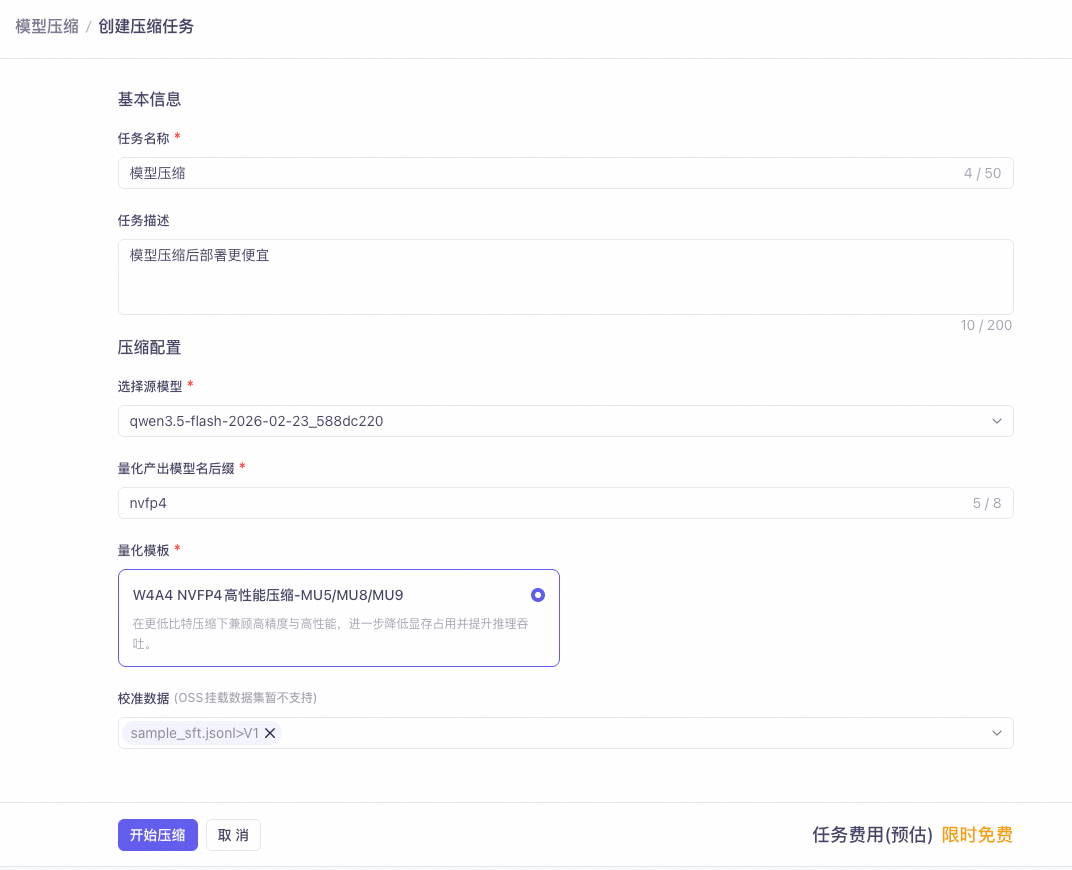
On the create compression task page, configure the following parameters:
Parameter
Required
Description
Task Name
Yes
Up to 50 characters. It is recommended to include the model abbreviation, quantization method, and version number for easier subsequent management.
Task Description
No
Up to 200 characters.
Source Model
Yes
Click to open the model selection dialog, which only displays fine-tuned models that can be compressed. If no available models appear in the dialog, complete model fine-tuning training first. Switching the source model automatically clears the selected quantization template, because the template lists supported differ across models.
Output Model Name Suffix
Yes
Only lowercase letters and digits are supported, up to 8 characters in length. Invalid characters are automatically filtered out. This suffix is appended to the source model name as the identifier of the compressed model.
Quantization Template
Yes
Available templates are displayed as a card grid. You must select a source model before selecting a template. A larger MU number in the template name indicates a smaller deployment specification and lower cost.
Calibration Data
Conditionally required
This field appears only when the selected quantization template includes calibration input parameters. You can select up to 5 datasets; OSS-mounted datasets are not supported. Datasets must be created and published in Data Management.
- After confirming the configuration is correct, click Start Compression. The button becomes clickable only after all required fields are filled in. Upon successful creation, you are automatically redirected to the task list page.
View compression task progress and logs
On the task list page, click a task name to enter the details page. The details page contains two tabs: Details and Log.
Details tab
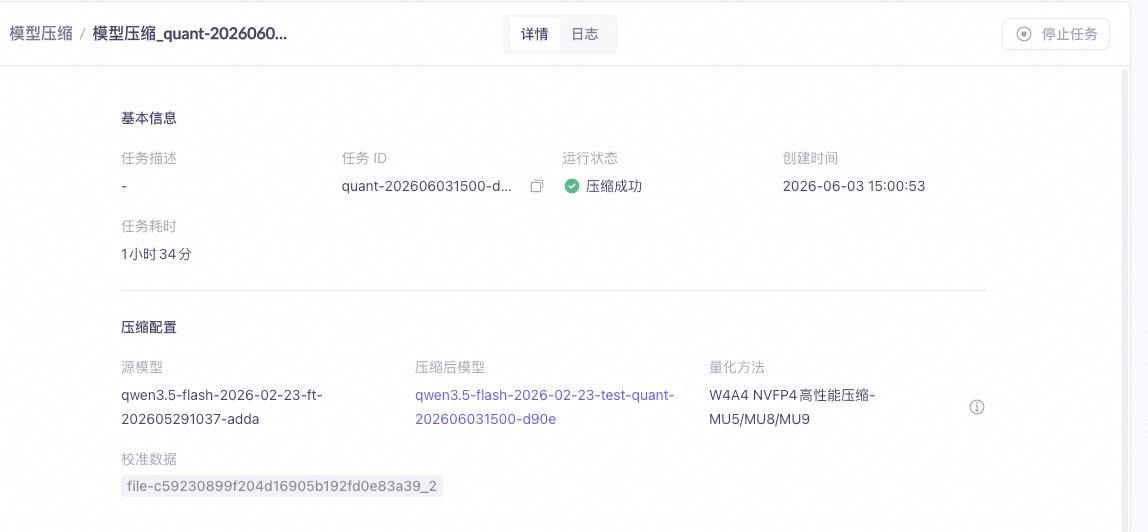
- Basic information: Task ID (copyable), running status, creation time, and task duration (updated in real time while running). When a task fails, the error message is additionally displayed.
- Compression configuration: Source model, compressed model, quantization method, calibration data, and other configuration information set at creation time.
Log tab
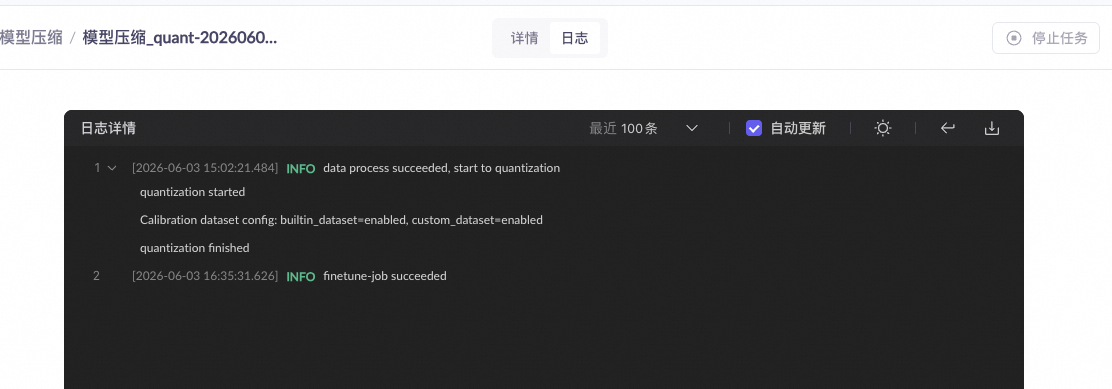
- Lines displayed: You can choose to display the most recent 100, 500, 2000, or 5000 lines of logs.
- Auto refresh: When enabled, the log content refreshes automatically every 30 seconds.
- Log level coloring: INFO (green), DEBUG (gray), ERROR (red), WARN (yellow).
- Log operations: Supports downloading full logs (not limited by the displayed line count), collapsing or expanding sub-entries, switching between dark and light modes, and toggling word wrap.
Failure troubleshooting
If a compression task fails, troubleshoot by following these steps:
- View the error message on the Details tab.
- Switch to the Log tab and search for ERROR-level logs.
- Download the full logs for detailed analysis.
- If the issue remains unresolved, submit a ticket and attach the task ID and log file.
Manage compression tasks
In the console, select Model Compression in the left navigation pane to enter the task list page and manage the compression tasks that you have created.

Task list
The task list displays the following 7 columns of information:
Column name | Description |
|---|---|
Task Name/ID | Task name and task ID. Click the task name to go to the details page. |
Quantization Template | The name of the quantization template selected when the task was created. |
Task Status | The current running status of the task. |
Source Model | The name of the fine-tuned model before compression. |
Compressed Model | The name of the model produced by compression. This is clickable only when the task succeeds, redirecting to the model center for viewing. |
Creation Time | The creation time of the task. |
Operation | The available operations, including stop and delete. Operation availability depends on the task status. |
Task status
Compression tasks have 7 statuses in total. The lifecycle is as follows:
- PENDING (not started): The task has been created and is waiting to be scheduled.
- QUEUING (in queue): The task has entered the execution queue.
- RUNNING (running): The task is executing compression.
- SUCCEEDED (compression succeeded): Compression is complete and the model has been produced.
- FAILED (compression failed): An error occurred during compression.
- CANCELING (stopping): The user initiated a stop and the task is being terminated.
- CANCELED (canceled): The task has been stopped by the user.
Stop and delete tasks
- Stop a task: Only tasks in PENDING and RUNNING statuses can be stopped. After clicking Stop, you must confirm again in the confirmation dialog. Once stopped, the task cannot be recovered. A stop button is also available on the details page.
- Delete a task: Only tasks in terminal states (SUCCEEDED, FAILED, CANCELED) can be deleted; tasks in the QUEUING status cannot be deleted. Deleting a task record does not affect the already-produced compressed model.
Billing
- The compression task itself is free for a limited time. The deadline is subject to console announcements.
- The compressed model is billed by MU specification during the deployment stage. For detailed deployment billing information, see Deployment.
FAQ
What if no model is available when creating a compression task?
What if no model is available when creating a compression task?
Can the compressed model be further fine-tuned or re-compressed?
Can the compressed model be further fine-tuned or re-compressed?
What is the difference between quantization, pruning, and distillation?
What is the difference between quantization, pruning, and distillation?
How do I choose a quantization template?
How do I choose a quantization template?
How do I choose calibration data?
How do I choose calibration data?
What if the compressed model's precision drops?
What if the compressed model's precision drops?
How is billing handled after the free period ends?
How is billing handled after the free period ends?
How do I use the free period to determine the best compression plan?
How do I use the free period to determine the best compression plan?