

Using WebRTC with the Multimodal Development Kit for real-time calls

Describes how to connect to the Multimodal Development Kit (multimodal-dialog) in a browser using WebRTC and JavaScript to enable real-time audio/video interaction with a multimodal AI application.

The Multimodal Development Kit targets hardware scenarios such as AI/AR glasses, learning devices, and intelligent robots. It provides visual application configuration, pre-built agents and plug-ins, and voice management. In WebRTC mode, audio is transmitted directly over UDP with built-in echo cancellation and noise reduction, making it suitable for low-latency browser interactions.

Prerequisites and notes

  1. Complete the following in the Alibaba Cloud Model Studio console:
  2. Use a modern browser that supports WebRTC (Chrome, Edge, Firefox, Safari, and so on).
  3. The browser must have microphone permission. For video interaction, camera permission is also required.
  4. Browsers cannot directly send SDP exchange requests to the server due to CORS restrictions. In the demo, run the curl command in a terminal to complete the connection. In production, this restriction does not apply when the request is proxied through a backend service.

Implement real-time calls

The following sequence diagram shows the complete WebRTC real-time call flow: WebRTC Multimodal Development Kit real-time call sequence diagram
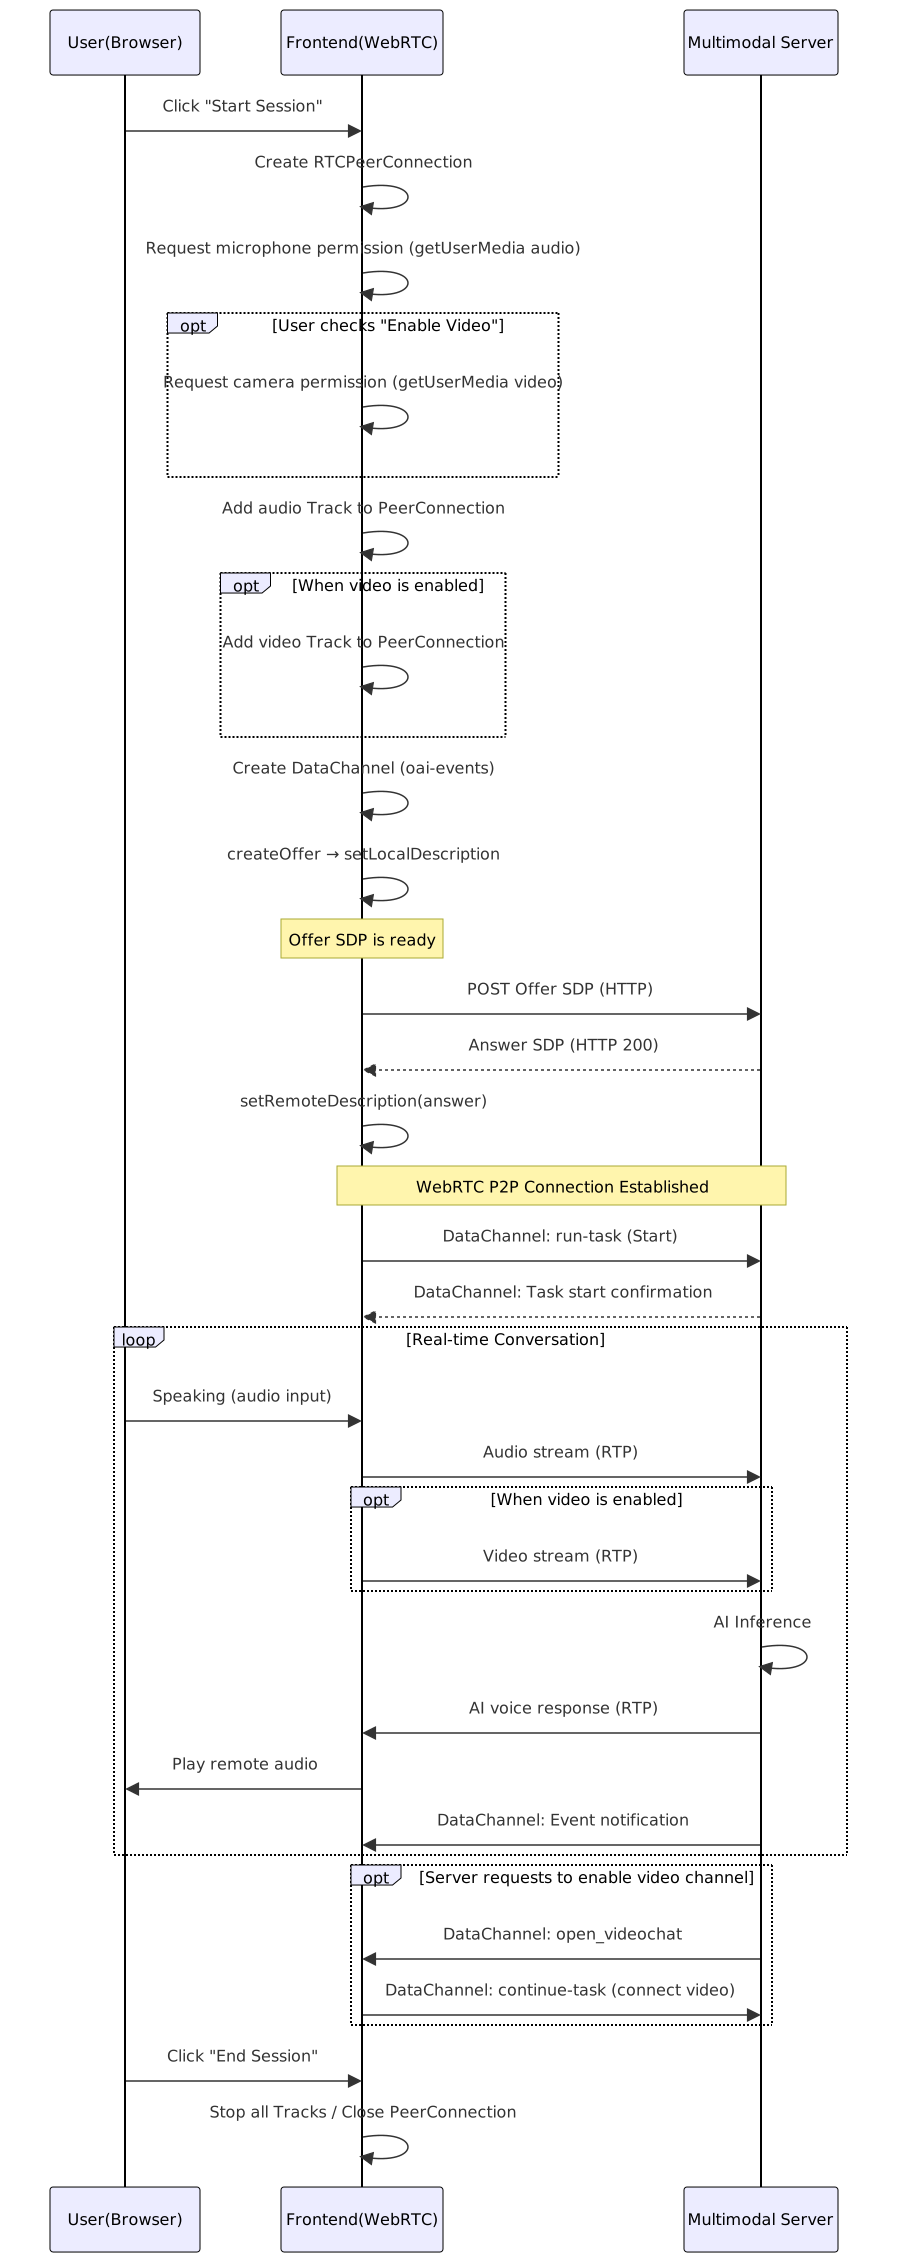
1111

Create RTCPeerConnection

Call the browser's native RTCPeerConnection constructor to create a connection instance. The server uses ICE-lite direct mode, so no ICE servers need to be configured.
pc = new RTCPeerConnection();
Register key callbacks:
pc.onconnectionstatechange = () => {
  if (pc.connectionState === 'connected') {
    // Connection established
  } else if (['failed', 'closed', 'disconnected'].includes(pc.connectionState)) {
    // Connection dropped; clean up resources
    endSession();
  }
};

pc.ontrack = (e) => {
  // Bind the remote audio stream to an audio element for playback
  const remoteAudio = document.createElement('audio');
  remoteAudio.autoplay = true;
  remoteAudio.srcObject = e.streams[0];
  document.body.appendChild(remoteAudio);
};

Get local media streams

Use navigator.mediaDevices.getUserMedia to request microphone access (required) and camera access (optional). Audio-only mode:
const localStream = await navigator.mediaDevices.getUserMedia({ audio: true });
Audio and video mode (for AI visual understanding):
const localStream = await navigator.mediaDevices.getUserMedia({
  audio: true,
  video: {
    facingMode: { ideal: 'environment' },  // Rear camera
    frameRate: { ideal: 30, max: 30 },
    width: { ideal: 640 },
    height: { ideal: 480 }
  }
});
Adjust the video frame rate based on your use case. For scenarios that require real-time AI scene understanding (such as object recognition or scene description), 15–30 fps is recommended.

Add media tracks to PeerConnection

Add the local audio track to the PeerConnection. If video is enabled, add the video track as well.
localStream.getTracks().forEach(track => pc.addTrack(track, localStream));
Maintain video quality in poor network conditions (optional): In poor network conditions, the browser may automatically reduce video resolution. Use sender parameters to help maintain quality:
const sender = pc.getSenders().find(s => s.track && s.track.kind === 'video');
if (sender) {
  const params = sender.getParameters();
  if (!params.encodings || params.encodings.length === 0) params.encodings = [{}];
  params.encodings[0].scaleResolutionDownBy = 1.0;
  params.encodings[0].maxBitrate = 2500000;  // 2.5 Mbps
  params.encodings[0].maxFramerate = 30;
  params.degradationPreference = 'maintain-resolution';
  await sender.setParameters(params);
}

Create DataChannel

Create a DataChannel named oai-events to exchange control messages with the server (run-task, event notifications, and so on).
const dc = pc.createDataChannel('oai-events');

dc.onopen = () => {
  console.log('DataChannel open');
  // Send run-task when DataChannel is ready
  sendStartMessage(dc);
};

dc.onmessage = (e) => {
  const evt = JSON.parse(e.data);
  handleServerEvent(evt, dc);
};
Also listen on pc.ondatachannel to handle DataChannels created by the server:
pc.ondatachannel = (event) => {
  const ch = event.channel;
  if (ch.label === 'txt' || ch.label === 'oai-events') {
    ch.onopen = () => sendStartMessage(ch);
    ch.onmessage = (e) => handleServerEvent(JSON.parse(e.data), ch);
  }
};

Generate Offer SDP

Call createOffer and setLocalDescription. The browser generates an Offer SDP that describes the local media capabilities. Since the server uses ICE-lite mode, you do not need to wait for ICE candidate collection — you can send the Offer SDP immediately after setLocalDescription.
const offer = await pc.createOffer();
await pc.setLocalDescription(offer);

// offer.sdp is the Offer SDP string to send

Exchange SDP (HTTP POST)

Send the Offer SDP to the server WebRTC endpoint via HTTP POST. The server returns an Answer SDP. Endpoint format: {workspace_id}.{region}.maas.aliyuncs.com, where workspace_id is the Alibaba Cloud Model Studio workspace ID (for example, llm-xxxxxxxxxx) and region is the deployment region (for example, cn-beijing). You can find these values in the Alibaba Cloud Model Studio console after creating a workspace. Request configuration:

Field

Description

URL

POST https://{workspace_id}.{region}.maas.aliyuncs.com/api/v1/webrtc/inference?model=multimodal-dialog

Content-Type

application/sdp

Header

Authorization: Bearer {DASHSCOPE_API_KEY}

Body

Client-generated Offer SDP string

Response

Success: HTTP 200 with the server's Answer SDP string

const API_KEY = 'your-api-key';       // Obtain from Alibaba Cloud Model Studio console
const WORKSPACE_ID = '{workspace-id}';  // Obtain from Alibaba Cloud Model Studio console
const REGION = 'cn-beijing';
const SIGNALING_URL = `https://${WORKSPACE_ID}.${REGION}.maas.aliyuncs.com/api/v1/webrtc/inference?model=multimodal-dialog`;

const resp = await fetch(SIGNALING_URL, {
  method: 'POST',
  headers: {
    'Content-Type': 'application/sdp',
    'Authorization': `Bearer ${API_KEY}`,
  },
  body: offer.sdp,
});

if (!resp.ok) throw new Error('SDP exchange failed: ' + resp.status);
const answerSdp = await resp.text();
Because browsers are subject to CORS restrictions, you cannot directly call the Alibaba Cloud Model Studio API from the browser. In the demo, run the curl command manually in a terminal. In production, proxy this request through a backend service.
curl command format:
curl -X POST 'https://{workspace_id}.{region}.maas.aliyuncs.com/api/v1/webrtc/inference?model=multimodal-dialog' \
  -H 'Content-Type: application/sdp' \
  -H 'Authorization: Bearer $DASHSCOPE_API_KEY' \
  --data-binary '<Offer SDP content>'

Set Answer SDP to establish connection

Set the Answer SDP received from the server as the remote description. The WebRTC connection is then established.
await pc.setRemoteDescription({ type: 'answer', sdp: answerSdp });
// Connection established; pc.connectionState will change to 'connected'

Send run-task to start session

After the WebRTC connection is established and the DataChannel is ready, the client sends a run-task message to start the multimodal session.
let currentTaskId = null;

function sendStartMessage(channel) {
  currentTaskId = generateTaskId();
  const msg = {
    payload: {
      input: {
        workspace_id: '{workspace-id}',
        app_id: '{app-id}',
        directive: 'Start'
      },
      task_group: 'aigc',
      task: 'multimodal-generation',
      function: 'generation',
      model: 'multimodal-dialog',
      parameters: {
        client_info: {
          user_id: '{user-id}',
          device: { uuid: '{device-uuid}' },
          network: { ip: '{client-ip}' }
        },
        upstream: {
          mode: 'duplex',
          sample_rate: '16000',
          type: 'AudioAndVideo'   // 'Audio' or 'AudioAndVideo'
        },
        dialog_attributes: {
          vocabulary_id: '{vocabulary-id}'  // Optional
        },
        downstream: {
          voice: 'longanhuan',
          sample_rate: 24000,
          audio_format: 'pcm'
        }
      }
    },
    header: {
      streaming: 'duplex',
      action: 'run-task',
      task_id: currentTaskId
    }
  };
  channel.send(JSON.stringify(msg));
}

function generateTaskId() {
  if (window.crypto && typeof window.crypto.randomUUID === 'function') {
    return window.crypto.randomUUID().replace(/-/g, '');
  }
  const r = () => Math.random().toString(16).slice(2);
  return (Date.now().toString(16) + r() + r()).slice(0, 32);
}
Parameter description:

Parameter path

Type

Description

payload.input.workspace_id

string

Alibaba Cloud Model Studio workspace ID, obtained from the console under Application Management

payload.input.app_id

string

Multimodal Development Kit application ID, obtained from the console under Application Management

payload.input.directive

string

Fixed value: Start

payload.parameters.client_info.user_id

string

User identifier in your business system, used for log tracing

payload.parameters.client_info.device.uuid

string

Device unique identifier, used for device-level analytics

payload.parameters.upstream.mode

string

Interaction mode: duplex (full-duplex), push2talk (push-to-talk), or tap2talk (tap-to-talk)

payload.parameters.upstream.type

string

Upstream media type: Audio (audio only) or AudioAndVideo (audio and video)

payload.parameters.upstream.sample_rate

string

Upstream audio sample rate, typically 16000

payload.parameters.downstream.voice

string

Downstream voice; select from the voice list in the Alibaba Cloud Model Studio console

payload.parameters.downstream.sample_rate

number

Downstream audio sample rate, typically 24000

payload.parameters.dialog_attributes.vocabulary_id

string

Optional. Vocabulary ID to improve recognition accuracy for domain-specific terms

The model selection, prompt, agents and plug-ins, knowledge base, and other configurations are managed visually in the Alibaba Cloud Model Studio console and do not need to be passed in code. The run-task only requires workspace_id and app_id; the server automatically loads the corresponding configuration.

Real-time conversation

After the run-task is sent, the session enters real-time conversation mode:
  • Upstream: Audio/video captured by the browser is automatically sent to the server via RTP
  • Downstream audio: AI voice responses are received through the ontrack callback and played back
  • Downstream events: Business events are received through the DataChannel
function handleServerEvent(evt, channel) {
  const type = evt.type || evt.header?.action;

  switch (type) {
    case 'open_videochat':
      // Server requests opening the video channel
      // Delay a few seconds to ensure the video processing channel is ready
      setTimeout(() => {
        channel.send(JSON.stringify({
          payload: {
            input: { text: '', type: 'prompt', directive: 'RequestToRespond' },
            parameters: {
              biz_params: {
                videos: [{ action: 'connect', type: 'voicechat_video_channel' }]
              }
            }
          },
          header: {
            streaming: 'duplex',
            action: 'continue-task',
            task_id: currentTaskId
          }
        }));
      }, 3000);
      break;

    default:
      console.log('[Server event]', type, evt);
      break;
  }
}
open_videochat mechanism: When upstream.type is set to AudioAndVideo, the client is already sending a video track over WebRTC. When the server needs it (for example, when the AI agent determines it needs to "see" the scene), it sends an open_videochat event. The client must reply with continue-task to confirm that the video channel is open. This mechanism enables on-demand video processing, which conserves server resources.
Mute / unmute:
// Mute
localStream.getAudioTracks().forEach(t => { t.enabled = false; });
// Unmute
localStream.getAudioTracks().forEach(t => { t.enabled = true; });
Enable / disable video:
// Disable video
localStream.getVideoTracks().forEach(t => { t.enabled = false; });
// Enable video
localStream.getVideoTracks().forEach(t => { t.enabled = true; });

End session and release resources

After the call ends, release all resources to avoid memory leaks and device occupation.
function endSession() {
  // 1. Close DataChannel
  if (dataChannel) {
    dataChannel.close();
    dataChannel = null;
  }

  // 2. Stop local media stream (release microphone/camera)
  if (localStream) {
    localStream.getTracks().forEach(t => t.stop());
    localStream = null;
  }

  // 3. Close PeerConnection
  if (pc) {
    pc.close();
    pc = null;
  }

  // 4. Reset state
  currentTaskId = null;
}

Important notes

  1. API key security: Never hard-code your API key in front-end code. In production, proxy the SDP exchange request through a backend service and keep the API key on the server side only.
  2. CORS restrictions: Browsers cannot directly call the Alibaba Cloud Model Studio API for SDP exchange. In production, forward requests through a backend proxy.
  3. HTTPS requirement: getUserMedia requires the page to be served over HTTPS in non-localhost environments.
  4. Interaction mode: The Multimodal Development Kit supports three interaction modes — duplex (full-duplex, user can interrupt at any time), push2talk (push-to-talk), and tap2talk (tap-to-talk). Choose the appropriate mode for your hardware.
  5. Video frame rate: For video understanding scenarios, 15–30 fps is recommended. If only occasional image recognition is needed, reduce the frame rate to save bandwidth.
  6. Browser compatibility: Chrome 90+, Edge 90+, Firefox 85+, and Safari 15+ are recommended.
  7. Single-instance restriction: Maintain only one RTCPeerConnection instance per page at a time. Close the existing connection before creating a new session.

Download the complete demo

The following is a complete HTML demo that you can open directly in a browser to experience multimodal interaction. Because of browser CORS restrictions, the SDP exchange is completed manually via a curl command. webrtc_multimodel_demo.html Steps:
  1. Open the file in a browser.
  2. Fill in the connection configuration: Endpoint (format: {workspace_id}.{region}.maas.aliyuncs.com), API key, Workspace ID, and App ID.
  3. To enable video interaction, select Enable video.
  4. Click Start session and grant the browser access to the microphone (and camera).
  5. If the browser can send the request directly (no CORS restrictions), the connection is established automatically. Otherwise, the page displays a curl command — copy it to a terminal, run it, and paste the returned Answer SDP back into the page.
  6. Once connected, speak into the microphone to start a real-time conversation with the multimodal AI.
  7. After the call, click Download remote audio to save a recording of the AI responses.
Token Plan
Model Playground
Fine-tuning
Model Compression
Statistics and Monitoring
Support